Showing posts with label Tips & Tricks. Show all posts

Friday, 27 December 2013

How to install Windows 7/8 From USB Drive


Do you own a laptop/Netbook/Notebook/PC without a CD/DVD Optical disk Drive?
If yes, then all the things written below may be useful to you.

If you have a personal computer without(or damaged) DVD optical drive and you have to install windows operating system on it then how will you make this to be possible? The first thing strikes in your mind is to install it via- a Installation DVD(as the setup files comes mainly in the form of ISO in a DVD), but as soon as you’ll realize that you don’t have a DVD drive in your machine, all your thinking will go into vain. You can also think about putting your HDD into some other compatible laptop having a working optical drive, but believe me you’ll not take chances to perform this chaos.
If you really don’t want to do the above things and want to install Windows in an easy way then you can perform the installing using a USB Flash drive i.e. A Pen Drive in more common terms.

So, How to install Windows using a Pendrive? The method is very simple and you can perform it without any hassles. The below guide is 100% working and tested all you need to pay attention to each and every commands written out below.
We’ll first create our USB bootable such that it can work as a Bootable device.

Requirements :

·         A USB Flash Drive with 4GB minimum capacity. (To hold the windows installation files)
·         Windows 7/8 Installation files.
·         A Working Windows7 machine.(for creating bootable USB)

Procedure:

  Step 1:  Plug in the USB into any of the working port and backup all the contents of the USB drive to a safe location suitable to you.

NOTE: If you are planning to have a fresh install of windows on the same computer make sure that not to put the backup files into the drive where the OS is currently installed.


Step 2: Open the Command Prompt with admin rights. Clickà”Start” and then Typeà”cmd” and then hità”CTRL+SHIFT+ENTER”. This will open the command prompt with admin privileges.


Step 3: Once the command prompt appears on the screen, type in “DISKPART".


Step 4: Once you reach the above screen, then next type “LIST DISK”. (Yes, There is a Space in between LIST and DISK)

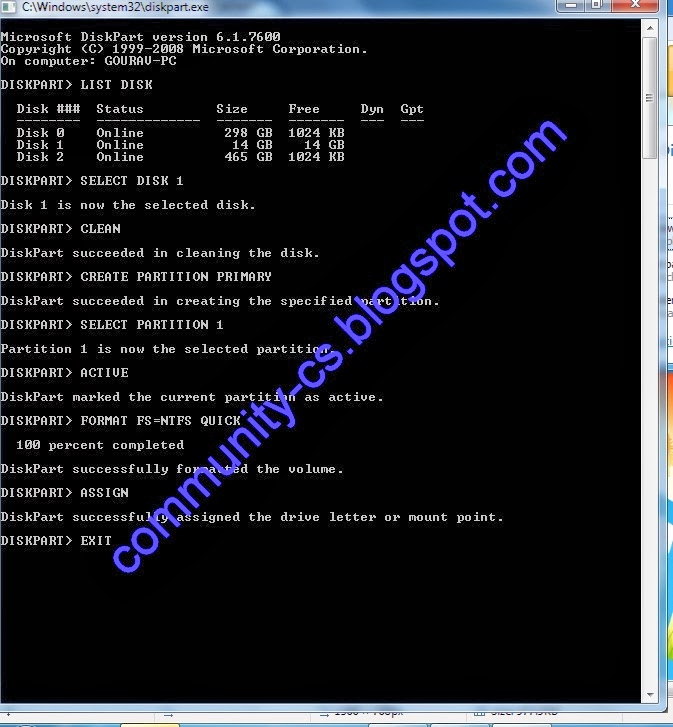
 Look at your USB “Disk ###” by looking at its total size. Make sure you have to select the correct disk no. of your USB Disk in the next step. In the below screen shot my USB flash disk drive number is “Disk 1”.


Step 5:  You have to type all the below commands one after the other. I have assumed here that your disk drive number is “Disk 1”. If you have other disk ### as your USB drive then you have to use that disk### only.

Once You are done with the Disk no. of the USB, type all one by one:

SELECT DISK 1
CLEAN
CREATE PARTITION PRIMARY
SELECT PARTITION 1
ACTIVE
FORMAT FS=NTFS QUICK
(this may take few seconds to complete)
ASSIGN
EXIT 


Step 6: Copy all the installation files of Windows 7or8 into your USB drive and let it to be completed.


Step 7: Re-open Command prompt and type the following command.
(Please note down the drive letter of your USB drive which can be C: D: E: F:  etc.  )
I am performing the below commands according to my USB Drive letter.

Type à G: and hit enter and then type “CD BOOT” and hit enter.


Step 8: Typeà “BOOTSECT.EXE/NT60 G: “
NOTE : Here G: is my USB Drive letter Change it according to yours.

You’re done with creating the USB as a booting device. Your device is now ready to boot and install windows.


Step 9: You have to restart your computer and need to change the “BOOT ORDER” at the BIOS. Change the first boot device to “USB” and the second Boot device to “HDD”.
Press “F10” to save the changes and then restart the computer.
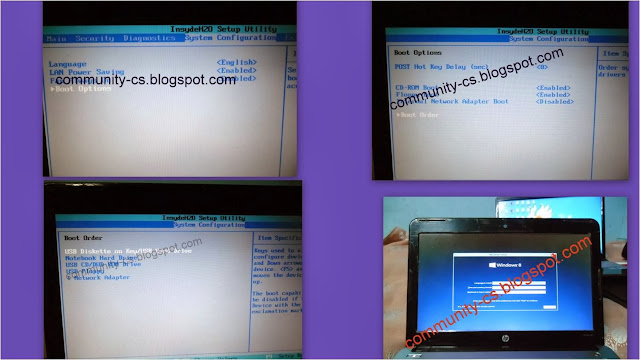

Once the windows files are successfully copied into the computer then your computer will restart and again starts to copy the installation files, you have to then remove your USB and restart your machine again.

Make sure you have followed all the steps correctly, however if you come up with any problem please feel free to ask all your doubts in the comment section.


After complete installation of the operating system, do check your C: drive (where the operating system is installed) and look for the windows.old folder.
Read How to remove Windows.old folder as this folder is occupying approximate of 12 GB's of your hard drive.

Saturday, 30 November 2013

How to Reset/Change/Delete the Windows Account Password


Hello all,

Have you ever faced the problem of forgetting your computers password??

If yes, then what major steps you take for recovering your password?

Repairing/Reinstalling windows or simply reformatting your PC!!!

Believe me if you are repairing or reinstalling the windows operating system again then you can no longer use your settings and software previously installed.

And you may lose some important data stored in the partition.

·     On the other hand, formatting your hard drive simply restores it to a new clean state with no data in it (As you all know).

Then what to do in-case you forget your computer’s “password”? Don’t worry you can easily get access to your computer without knowing the password also. All you need is to pay attention what I have written in this article.


So, let us begin with learning a basic concept on “How windows operating system stores its password”. Windows operating system stores the password of its users in file named as “SAM.log” which is maintained by the utility of windows “SAM.exe”. SAM generally stands for “Security Accounts Manager”. SAM stores users’ passwords in a Hashed format (in LM hash and NTLM hash). Since a hash function is one-way, this provides some measure of security for the storage of the passwords. Also the SAM files hides themselves as soon as a user logs in into a computer.

You may read about SAM Files here :
en.wikipedia.org/wiki/Security_Accounts_Manager


 As I said, “Windows stores its password in hashed format inside the SAM files”. So, think if we have the access to change the contents of the SAM files or simply delete the SAM files then we can easily change/delete the user password for our PC or others PC too. But on the other hand I had also said that windows stores the passwords in Hashed format (so it is probably impossible for Human’s to decode the particular hashed algorithm as only Microsoft knows how the algorithm works), so we can’t change the contents of the SAM files.

But what if we simply delete the SAM files as this can delete the current password. Can we delete the SAM files while using the computer? The answer is simply “NO” because the SAM files hide themselves soon as the user log in into the computer.

So then how to change/reset the password now? As, I’ve told the SAM files hide themselves when the user logs in. So, if we delete the SAM files at the boot time or Using some other Storage device(such as another Hard disk as the primary hard disk, then we can easily access the SAM files and delete them too)


Let us first try to delete the SAM files using an additional hard drive. Below are the steps and the requirements for performing this operation:  

NOTE: I'LL USE THE NAME "PASS_HDD" FOR THE HARDDISK HAVING PASSWORD AND SIMPLY "HDD" FOR THE OTHER ONE.

Requirements: You need an additional hard disk with installed operating system.

So Let us start with the first step,
Step 1 : Make the connections of the HDD in your computer along with the PASS_HDD connected also.

STEP 2 : Start your computer and come to the BOOT MENU, use your PASS_HDD as a secondary hard disk and your HDD as primary hard disk and then save the changes and exit from the BIOS menu by pressing F10 and clicking on “YES”.

Step 3 : After the computer starts, open that drive of PASS_HDD in which the operating system is installed.(Drive containing Windows files)
(We mostly use C:\ drive for OS installation, However you have to select the drive in which your OS is installed)

Step 4:  Change your current  Directory tree to : “C:\WINDOWS->SYSTEM32->CONFIG”


Step 5: Identify files named as SAM.exe and SAM.log and then simply delete both of them.

 
Step 6: Turn off your PC and then remove your HDD and boot your computer with PASS_HDD only and boot it as default primary Disk Drive.


You will be happy after you see the starting, there will be no passwords anymore..!!


The above case generally helps us when we have an additional Hard drive. But, What in case you don’t have any additional Disks??
You may choose the second way to resetting/deleting the account password i.e. deleting SAM files on the boot time.

To delete the files on boot time follow the below rule:

Boot up with DOS and delete the SAM.exe and SAM.log files from “C:\Windows\system32\config” in your hard drive using the command prompt. Now, when we boot in Windows NT, the password of the account will be blank viz. “No password”.

NOTE: This solution works only if your hard drive is of FAT kind.

However there are so many tools available online on internet using which we can easily remove/reset the windows password, few of which are written below:

1)Ohpcrack

2)Kon Boot

3)Cain & Abel

4)LCP

5)John the Ripper

6) Hiren Boot


NOTE: YOU WILL  FIND MANY RESULTS ON INTERNET FOR THE QUERIES ON  "HOW TO USE THESE TOOLS".

This ends my article on “How to Reset/Change/Delete the Windows Account Password”. Hope you liked the article. Do give your suggestions in the comment box.

Thanks
J


Wednesday, 17 July 2013

Computer Mouse Tips Everyone Should Know

There are so many things from which you can use your computer mouse in an efficient way, most of the users do not use the mouse in an advantageous way. In this article you will come to know some computer mouse tips and secrets that may help you to use your computer mouse in an efficient way with increased productivity while you are on the computer.

======================
Select with double and triple click
======================

A word can be selected by double-clicking the word in a text document or in a webpage. If we want to highlight the whole paragraph within a document, then we have to  click the mouse button three times on any text in the paragraph.


=================
Shift key and mouse click
=================

There are so many text editors and programs in which we can highlight all or some portion of text.We normally do a click and drag of the mouse pointer but we can use the Shift key and the mouse also. For example, place the cursor at the beginning of a paragraph in a text editor, hold down the Shift key and click at the end of the paragraph to highlight the full paragraph.

======================
Use the Scroll wheel
======================

Mouse wheels  have the ability to scroll up and down on any page full of text or pictures. We can use the mouse  wheel for some other purposes also.

Apart from scrolling up and down, the mouse wheel can be used also as a button. Pressing the wheel will act like a third mouse button. This button can be used in a browser to open a link in a new tab this can be done by clicking the wheel on any link and can also be used to close a tab by clicking the wheel on any open tab.

By holding the CTRL key and scrolling up and down, we can also zoom In and Out on a web page, word document, excel spreadsheet, etc.

Scrolling UP and DOWN while holding the SHIFT key while browsing  Internet, Scrolling down goes back and scrolling up goes forward.

NOTE: Some mouse wheels can be pushed left or right to also move back and forward on a web page.


===========
Use the right-click
===========
In a browser pressing and holding Ctrl while clicking on any link will open that link in a new tab.


=======================
Ctrl key and mouse click or highlight
=======================

Holding down the Ctrl key and tapping left-click on multiple objects to  select multiple objects or we can highlight multiple sections of text.
Example:-

Holding  the Ctrl key and click on multiple files to select selected files at once. If  different parts of a paragraph or web page are wished to be highlighted , we could also hold down the Ctrl key and select each section we wish to copy.

Mozilla Firefox users can also hold down the Ctrl key and individually click on each cell in a table they wish to copy or drag their mouse down a row to select just that row or text without selecting any of the other text in that table.


=====================
Use the Windows Snap To feature
======================

Take full advantage of the Windows mouse Snap To feature, which will automatically move your mouse to buttons that appear in a dialog box. For example, if you delete a file or close a window you may get a prompt asking you if you are sure you want to perform the task. With the Snap To feature enabled, the mouse cursor automatically moves to the Ok button, so all you will have to do is click the mouse button if you agree. This saves you the time of having to move the mouse cursor over to the Ok button and then click Ok. To enable this feature open the Mouse properties under the Windows Control Panel and check the Snap To check box under the Pointer Options tab.

Tip: While changing this feature we also suggest looking at other available options in the Mouse settings. For example, increasing the Motion speed can also help increase your productivity while using the mouse.

===========================
Manage the open window with the mouse
===========================

Double-click the top title bar of any window to maximize a window or if it is already maximized resize it to a window. You can also double-click the icon for the window in the top-left corner of the window to close that window.

========================
Move the mouse with your keyboard
========================

Instead of using the mouse that came with your computer you can also enable Windows to use the number pad as a mouse.

================
Customize your mouse
================
Finally, if you have a mouse with more than two buttons, installing the included mouse software will allow you to customize the mouse even more. For example, if you don't use the side buttons to move back and forth in a web page change it to something you do more often, such as switching between open windows or opening the calculator.

Join Our Facebook group and share your Knowledge with Us : Computer Geeks

Thursday, 20 June 2013

Puzzle Game in VLC media Player

Are you getting bored?

Want some fun while watching a boring movie?

Here is the Coolest trick to play brand new puzzles everytime or you can say a new puzzle every second using VLC media player.

So, How can you play Puzzle Game with your  VLC Media Player.
While playing a video in VLC you can puzzle up your video and try to Unpuzzle it with lots of fun.


Follow these steps:-

1.First of all play any Video in VLC media Player.


2.Now the trick begins, Now Navigate to Tools –> Effect & Filters or simply press CTRL+E.


3.A new window will pop out named as "Adjustment and Effects" in that window click on the "Video Effects" tab.


4.In "Video effect" tab click on "Geometry" and then Check the Puzzle option as shown in the below image.
You can adjust the level of difficulty in the puzzle by increasing the number of rows and columns.
and now enjoy the puzzle game.


To Undo these changes follow steps 1 to 4 as described above and then Uncheck the Puzzle box in the "Geometry "tab.

Have fun..!!

Please Join-  Computer Geeks!!  and Computer Science-Community

Monday, 15 April 2013

Things which you can do with Google

Hello folks..!

There are many things which you can do with google itself..!!


Google will search only those things which you want to search.

 suppose if you want "Definitions" only 
Pull up the definition of the word by typing "define" followed by the word you want the definition for. For example, typing: "define bravura" would display the definition of that word.

Local search

Visit Google Local enter the area you want to search and the keyword of the place you want to find. For example, typing: restaurant at the above link would display local restaurants.

Phone number lookup

Enter a full phone number with area code to display the name and address associated with that phone number.

Find weather and movies

Type "weather" or "movies" followed by a zip code or city and state to display current weather conditions or movie theaters in your area. For example, typing weather 84101 gives you the current weather conditions for Salt Lake City, UT and the next four days. Typing movies 84101 would give you a link for show times for movies in that area.

Track airline flight and packages

Enter the airline and flight number to display the status of an airline flight and it's arrival time. For example, type: delta 123 to display this flight information if available.

Google can also give a direct link to package tracking information if you enter a UPS, FedEx or USPS tracking number.

Translate

Translate text, a full web page, or search by using the Google Language Tools.

Pages linked to you

See what other web pages are linking to your website or blog by typing link: followed by your URL. For example, typing link:http://www.computertechnogeeks.blogspot.com displays all pages linking to Computer Tips Tricks and Hacks.

Find PDF results only

Add fileType: to your search to display results that only match a certain file type. For example, if you wanted to display PDF results only type: "dell xps" fileType:pdf -- this is a great way to find online manuals.

Calculator

Use the Google Search engine as a calculator by typing a math problem in the search. For example, typing: 100 + 200 would display results as 300.

Stocks

Quickly get to a stock quote price, chart, and related links by typing the stock symbol in Google. For example, typing: msft will display the stock information for Microsoft.


Wednesday, 10 April 2013

Tips For Launching Your Own Blog


Blogging has developed from a specialized hobby to a full-time occupation. Many writers live off of their blogs, and anyone with something unique to say can gain an audience and a steady paycheck with the right techniques.

Starting A New Blog

Launching a blog requires some planning. This starts with the name and address of the blog.
It’s important to pick a good domain name, as the URL of a website is one of the most powerful tools that a blogger has at his disposal for repeat traffic. Think of a domain name as a 21st century toll free number: It has to be memorable or it won’t be effective.
  • blog’s domain name should be descriptive of its subject and preferably a bit unusual. For example, a blog about arrowheads could simply be titled, “Arrowheads And How To Identify Them,” but something like “As The Arrowhead Flies” would be more memorable.
Bloggers should also try to pick a unique subject or to bring a unique perspective to the entries. Writing about hundreds of subjects will rarely lead to a successful blog. Content should be focused and direct. Visitors should know exactly what type of information that they can find on the blog, and using direct and simple approach improves the chances of regular traffic.

Blog Hosting Providers

Most bloggers use a hosting provider like WordPress.com or Blogger. There are several major advantages to these services. They’re inexpensive and may even be free until a blog develops large amounts of regular traffic. Also, the online blogging software provided by these hosting services offers instant, easy organization for a blog of any size.
Many bloggers know only basic HTML and don’t really want to invest a lot of time into things like page design. For these individuals, integration with a hosting provider can keep costs down while streamlining the blogging process. They’re also ideal for first time bloggers because they simplify the process. By using a hosting provider you’ll spend more time writing and less time worrying about page design and web programming languages.
Professional and amateur bloggers will need to consider the price and uptime of various hosting providers before making a selection. The service packages of websites like WordPress.com and Blogger change quite often in both price and offerings. It’s usually a good idea to start out with a package that offers at least 50% more capability for incoming traffic than you plan on using each month. This way, your blog won’t suddenly crash if you write a successful post.
Blogging services can quickly become expensive. They’re worth the money in the long run, as they’ll allow you to keep all of the earnings from ads on your new blog–which is something that free alternatives with “unlimited bandwidth” won’t offer you.
Speaking of money, you’ll have to be on the lookout for ways to make a profit from a blog. Most blogs use ads from Google and Amazon Marketplace. Many bloggers also offer other services and products directly from their sites.

Promoting Your Blog

Blogs need to be promoted in order to flourish. It’s very rare for a blog to receive large amounts of traffic from search engines like Google alone, especially when the blog’s just getting started. A good promotion strategy is absolutely essential, and a strong promotion strategy begins with social media websites.
Promote each blog post from a new blog on websites like Twitter and Facebook. Don’t spam your friends and followers; only post a single link to each blog post, and try to reach out to other bloggers through social websites. Developing a relationship with other writers will allow you to learn about the good habits that lead to regular traffic. You can even ask another writer to post a guest entry on your blog from time to time. This is a good way to build an audience of regular readers.
Always check the comments for each entry and respond to your readers. Cultivate a sense of community by interacting with each commenter and even addressing some of their questions or comments directly in new blog posts. This encourages the return traffic that is important for a new blog.
Finally, blog regularly. Any blog will fail if it doesn’t have regular posts. Posting once a day or more will keep visitors coming back and will quickly lead to better opportunities for money and better traffic. Every blogger should consider consistency to be extremely important–keep a consistent stream of quality entries for the best possible success.


Thank you..:))


if you are a computer geek than join this group on facebook : 
https://www.facebook.com/groups/439802949391492/https://www.facebook.com/pages/Im-a-Programmer-and-I-have-an-awwwsome-life/123101914509760


Thursday, 28 March 2013

How to use Whatsapp on PC


I have seen many yahoo questions and google queries about "HOW to use Whatsapp on a PC","Whatsapp for Computer","Whatsapp for MAC/Windows".
Now here is a trick How you all can Download and use Whatsapp for your MAC and Windows machine..!!


Step 1. Download and Install
BlueStacks for Windows or Mac OSX.

Step 2. Open BlueStacks.
Step 3. Click on the Search icon on top right corner.
Step 4. Enter WhatsApp and click on Find button.
Step 5. Click the Install button next to WhatsApp.
Step 6. Start WhatsApp Messenger on BlueStack
Step 7. You will now have to enter your phone number.
Step 8. Enter the 6 digit verification code...!! and thats it...!!

isn't is amazing..!!

apart from Whatsapp only you can also run all your andoroid apps or all mobile apps on your PC itself..!!


Bluestack app player lets you run apps from your phone fast and full screen on MAC and Windows.

Tuesday, 26 March 2013

Create a folder named as "CON" in Windows


Hello all ..!!


Today i'll show you some cool windows tricks,which you may don't know..!!

many people say that you cannot create a "CON" folder in windows...!!


I"ll show u how you can create a folder with name "con" "prn" "null" etc.


follow these steps..!


1. Open "cmd" with administrative privileges.

2. Go to the directory where you want to create the folder by using "cd" command which is used to change the directory.


for ex. if u want to create the folder in the 'D" drive of your computer then type : "cd d:" or simply "d:" and hit 'enter"


3. Then type "md\\.\d:\con" and hit enter.

4. Now go to your D: drive and check there...there is a folder named as "con" will be created.

5. Simply it you want to remove that directory just type in command prompt "rd\\.\d:\con" and hit enter.

your folder will be removed from that drive..!


similarly you can make folders named as "prn" and "null" also...!